- Chess World Cup
- FIDE Grand Prix
- Olympiad
- World Championship
- List of strong tournaments
- List of world championships

- Checkmate patterns
- Chess openings
- Chess strategy
- Chess tactics
- Chess theory
- Endgames
- Pawn structure
- Problems/Compositions


|
|||||||||||||||||||||||||||||||||||||||||||||
| Moves | 1.d4 Nf6 2.c4 e5 | ||||||||||||||||||||||||||||||||||||||||||||
|---|---|---|---|---|---|---|---|---|---|---|---|---|---|---|---|---|---|---|---|---|---|---|---|---|---|---|---|---|---|---|---|---|---|---|---|---|---|---|---|---|---|---|---|---|---|
| ECO | A51-A52 | ||||||||||||||||||||||||||||||||||||||||||||
| Origin | Adler-Maroczy, Budapest 1896 | ||||||||||||||||||||||||||||||||||||||||||||
| Named after | Budapest, Hungary | ||||||||||||||||||||||||||||||||||||||||||||
| Parent | Indian Defence | ||||||||||||||||||||||||||||||||||||||||||||
| Synonym(s) | Budapest Defence | ||||||||||||||||||||||||||||||||||||||||||||
The Budapest Gambit (or Budapest Defence) is a chess opening that begins with the moves:
Despite an early debut in 1896, the Budapest Gambit received attention from leading players only after a win as Black by Grandmaster Milan Vidmar over Akiba Rubinstein in 1918. It enjoyed a rise in popularity in the early 1920s, but nowadays is rarely played at the top level. It experiences a lower percentage of draws than other main lines, but also a lower overall performance for Black.
After 3.dxe5 Black can try the Fajarowicz variation 3...Ne4 which concentrates on the rapid development of the pieces, but the most common move is 3...Ng4 with three main possibilities for White. The Adler variation 4.Nf3 sees White seeking a spatial advantage in the centre with his pieces, notably the important d5-square. The Alekhine variation 4.e4 gives White an important spatial advantage and a strong pawn centre. The Rubinstein variation 4.Bf4 leads to an important choice for White, after 4...Nc6 5.Nf3 Bb4+, between 6.Nbd2 and 6.Nc3. The reply 6.Nbd2 brings a positional game in which White enjoys the bishop pair and tries to break through on the queenside, while 6.Nc3 keeps the material advantage of a pawn at the cost of a weakening of the white pawn structure. Black usually looks to have an aggressive game (many lines of which can shock opponents that do not know the theory) or cripple white's pawn structure.
The Budapest Gambit contains several specific strategic themes. After 3.dxe5 Ng4, there is a battle over White's extra pawn on e5, which Black typically attacks with ...Nc6 and (after ...Bc5 or ...Bb4+) ...Qe7, while White often defends it with Bf4, Nf3, and sometimes Qd5. In the 4.Nf3 variation the game can evolve either with Black attacking White's kingside with manoeuvres of rook lifts, or with White attacking Black's kingside with the push f2-f4, in which case Black reacts in the centre against the e3-pawn. In numerous variations the move c4-c5 allows White to gain space and to open prospects for his light-square bishop. For Black, the check Bf8-b4+ often allows rapid development.
In a Chess Notes feature article, Edward Winter showed that the origins of this opening are not yet entirely elucidated. The first known game with the Budapest Gambit is Adler-Maróczy (played in Budapest in 1896). This game already featured some key aspects of the gambit, such as active play for the black pieces, and White making the typical mistake of moving the queen too early. As the player of the white pieces was not a strong player, the new opening went unnoticed apart from the local experts who had witnessed the game. The Hungarians István Abonyi, Zsigmond Barász and Gyula Breyer further developed the opening. Abonyi played it in 1916 against the Dutch surgeon Johannes Esser in a small tournament in Budapest. The Austrian player Josef Emil Krejcik played it against Helmer in Vienna in 1917. Carl Schlechter published an optimistic analysis of the gambit in the Deutsche Schachzeitung.
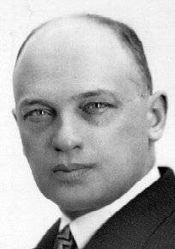 Tartakower, a practitioner of the Budapest Gambit
The first use of the opening against a world-class player was at Berlin in April 1918, a double round-robin tournament with four players: Akiba Rubinstein, Carl Schlechter, Jacques Mieses and Milan Vidmar. Vidmar had to play Black in the first round against Rubinstein, then ranked the fourth best player in the world with a very positional style. At a loss for what to play, he sought advice from his friend Abonyi, who showed him the Budapest Gambit and the main ideas the Hungarian players had found. Vidmar followed Abonyi's advice and beat Rubinstein convincingly in just 24 moves. This victory so heartened Vidmar that he went on to win the tournament, while Rubinstein was so demoralised by this defeat that he lost another game against Mieses and drew a third one against Schlechter in the same opening.
After this tournament, the gambit finally began to be taken seriously. Top players like Savielly Tartakower and Siegbert Tarrasch started to play it. Schlechter published in 1918 the monograph Die budapester Verteidigung des Damengambits, which can be considered the first book on this opening. The gambit reached its peak of popularity (around five Budapest Gambits for every thousand games played) around 1920, so much so that many White players adopted the move-order 1.d4 Nf6 2.Nf3 to avoid it.
The leading exponents of 1.d4 started to look for reliable antidotes. Alexander Alekhine showed how White could get a strong attack with 4.e4 in his games against Ilya Rabinovich (Baden-Baden 1925) and Adolf Seitz (Hastings 1925-26). But a few weeks later a theme tournament on the Budapest Gambit was held, in Budapest, and the result was 14½-21½ in Black's favor. Another tournament in Semmering the same year saw Alekhine losing to Karl Gilg in his pet line with White against the gambit, so that the e4-line had a mixed reputation. Meanwhile, more positional plans were also developed for White. Rubinstein showed how White could get a small positional advantage with 4.Bf4 Nc6 5.Nf3 Bb4+ 6.Nbd2, an assessment still valid today. The possibility 6.Nc3 was also considered attractive, as structural weaknesses were not valued as much as a material advantage of one pawn in those days. By the end of the 1920s, despite the invention of the highly original Fajarowicz variation 3...Ne4 in 1928, the Budapest Gambit was considered theoretically dubious.
This assessment was left unchanged for decades, as few players at the highest level used the Budapest Gambit and information about games from lesser players could not easily be found. During that time, various responses were developed against the 4.Bf4 line; these included 4...g5, invented by István Abonyi, further developed by the masters Bakonyi and Drimer. The master Kaposztas showed that even when White succeeded in his positional plan, it only meant for Black a worse endgame with drawish tendencies. Two pawn sacrifices were also introduced in the variation with 6.Nbd2 (still in the 4.Bf4 line), based on pawn pushes d7-d6 or f7-f6 and a quick attack against b2.
The Budapest Gambit saw a short-lived revival in 1984-85 when Chess Informant included three games (as many as in the previous fifteen years), all played at a high level of competition, and all won by Black. But White players found reinforcements and even invented a line with 4.e3 and 5.Nh3. In the 21st century, despite Shakhriyar Mamedyarov's successful efforts to rehabilitate the line 4.Bf4 g5, the Budapest Gambit almost never appears at the highest level., however Richard Rapport with black defeated Gelfand using the opening in round 2 of the 2014 Tata Steel Chess competition.
In the database of the website ChessGames.com, the Budapest Gambit scores 28.9% Black wins, 44.1% White wins and 27.1% draws. The percentage of draws is especially low compared to mainstream alternatives such as 2...e6 (43.7% draws) or 2...g6 (37% draws). This opening gives more chance to win for both opponents, although the percentage of Black wins is still lower than the alternative 2...c5. In the main line 3.dxe5 Ng4 4.Bf4 the percentage of Black wins already falls to 21.1%, lower than the main lines after 2...e6 or 2...g6.
The Budapest Gambit has never been widely used as Black by the top-ten chessplayers. Richard Réti used it five times in the period 1919-26 when he was among the ten best players in the world, but he scored only 1½ points. Savielly Tartakower used it four times in 1928 when he was the eighth-best player in the world, including thrice in one tournament (Bad Kissingen 1928) but he scored only ½ point against world-class opposition: Bogoljubov then ranked number four in the world, Capablanca ranked number two, and Rubinstein ranked number seven. Rudolf Spielmann used it thrice in 1922-23 when he was about number 9-12 in the world, with a win against Euwe but defeats against Yates and Sämisch. Nigel Short played the gambit twice in the years 1992-93 when he was number 7-11, scoring only ½ points against Karpov (then ranked number two) and Ivanchuk (then ranked number three). Recently, Mamedyarov used it twice in 2004 (scoring 1½ with a win against Van Wely) when he was not already among the top-players, and six times in 2008 when he was about number 6-14; he scored five points with wins against former world champion Kramnik (then ranked number three), and grandmasters Tkachiev and Eljanov, but all six games took place in rapid or blitz events.
Nicolas Giffard summarises the modern assessment of the Budapest Gambit:
[It is] an old opening, seldom used by champions without having fallen in disgrace. While White has several methods to get a small advantage, this defence is strategically sound. Black gets a good pawn structure and possibilities of attack on the kingside. His problems generally come from the white pressure on the d-column and a lack of space to manoeuvre his pieces.
Boris Avrukh writes, "The Budapest Gambit is almost a respectable opening; I doubt there is a refutation. Even in the lines where White manages to keep an extra pawn, Black always has a lot of play for it."
| a | b | c | d | e | f | g | h | ||
| 8 |

            |
8 | |||||||
| 7 | 7 | ||||||||
| 6 | 6 | ||||||||
| 5 | 5 | ||||||||
| 4 | 4 | ||||||||
| 3 | 3 | ||||||||
| 2 | 2 | ||||||||
| 1 | 1 | ||||||||
| a | b | c | d | e | f | g | h | ||
In the Alekhine variation White does not try to defend his e5-pawn and keep his material advantage, but instead he concentrates on building an imposing pawn centre. This brings him good prospects of a space advantage that may serve as a basis for a future attack on the kingside. However, the extended pawn centre has its drawbacks, as Lalic explains: "White must invest some valuable tempi in protecting his pawn structure, which allows Black to seize the best squares for his minor pieces with excellent prospects for counterplay against the white centre."
Hence in this variation Black lets White build his pawn centre only to undermine it later, a playing philosophy espoused in the teachings of the hypermodern school. The strategic themes are similar to the ones that can be found in other openings like the Four Pawns Attack, the Alekhine Defence or the Grünfeld Defence.
The "Budapest rook" is a manoeuvre, introduced by the IM Dolfi Drimer in 1968, with which Black develops the a8 rook aggressively along the sixth rank using the moves a7-a5 and the rook lift Ra8-a6-h6. For example, this can happen in the Adler variation after the move sequence 1.d4 Nf6 2.c4 e5 3.dxe5 Ng4 4.Nf3 Bc5 5.e3 Nc6 6.Be2 Ngxe5 7.Nxe5 Nxe5 8.a3 a5 9.0-0 0-0 10.Nc3 Ra6 11.b3 Rh6.
 The rook lift of the Budapest rook, along with an attacking queen manoeuvre.
The rook is then used to support a piece attack against White's castled King. Black can easily get several pieces around the white king, notably a rook to h6, a queen to h4 and a knight on g4. The queen's arrival on the h4-square is facilitated by the absence of a white knight on the f3-square (that would otherwise cover the h4-square) and of a black knight on the f6-square (that would block the way for the black queen). If White tries to defend with h2-h3, this may allow the Bc8 to be sacrificed at h3 in order to open the h-file.
The Bc5 may not seem particularly useful in this attack, but by eyeing e3 it makes it difficult for White to play f4 to chase away the black knight; furthermore, the attack on e3 is sometimes intensified with major pieces doubling on the e-file. Besides, the Bc5 can sometimes be recycled to the b8-h2 diagonal via Bc5-a7-b8, to apply still more pressure on h2. It can also stay on the a7-g1 diagonal to put pressure on f2, if White pushes e3-e4 at some stage.
The "Budapest rook" was an invigorating innovation of the 1980s, and gave the gambit new life. However, inconveniences arise from delaying d7-d6 in order to allow the lift: the light-square bishop has to wait a long time to develop, and any attack on the Bc5 is potentially annoying for Black (since it means either closing the sixth rank with ...d6/...b6, abandoning the active a7-g1 diagonal, or blocking the rook when deployed to a7). This, in addition to the risk of awkwardness in the king side (a knight on f5 will fork the Rh6 and the Qh4) and the single-mindedness of Black's plan (with nothing to fall back on if the direct attack is repelled), has made some revisit the old lines, where it is instead the king's rook that is developed to h6. The queen's rook can then be retained on the queenside, and will be well-placed if the b-file opens as a result of Black's Bc5 being exchanged and recaptured with a b6 pawn.
| a | b | c | d | e | f | g | h | ||
| 8 |
|
8 | |||||||
| 7 | 7 | ||||||||
| 6 | 6 | ||||||||
| 5 | 5 | ||||||||
| 4 | 4 | ||||||||
| 3 | 3 | ||||||||
| 2 | 2 | ||||||||
| 1 | 1 | ||||||||
| a | b | c | d | e | f | g | h | ||
In most variations Black has the opportunity to play Bb4+, a move whose advisability depends on White's possible answers. If White blocks the check with Nb1-c3 then Black should capture the knight only if White is forced to take back with the pawn, after which the isolated, doubled pawns are a positional advantage for Black that fully compensates the loss of the bishop pair, and even the gambitted pawn. Due to its immunity to pawn attacks, the c5-square may be used by Black as a stronghold for his pieces. Piece exchanges can be good for Black even if he is a pawn down, as he can hope to exploit the crippled pawn structure in the ending. On the other hand, if White can recapture with a piece, the trade on c3 typically concedes the bishop pair for insufficient compensation.
If White is compelled to play Nb1-d2, it is sometimes a minuscule positional concession, as it makes it harder for this knight to reach its ideal square d5. However, if Black is later compelled to exchange Bxd2, that is advantageous to White who thereby gains the bishop pair. Besides, in some situations the Bb4 could be as misplaced as the Nd2. Finally, if White has to play Bd2, then Black should exchange the bishops only if White is forced to recapture with the Nb1, as a recapture by the Qd1 would still allow the Nb1 to reach the d5-square through Nb1-c3-d5.
For example in the Alekhine variation, after 1.d4 Nf6 2.c4 e5 3.dxe5 Ng4 4.e4 Nxe5 5.f4 Ng6 6.Nf3, the move 6...Bb4+ (see diagram at right) is good because White has no good reply apart from 7.Nc3. Indeed, 7.Nbd2? just loses a pawn after 7...Nxf4 whereas 7.Bd2?! Qe7! causes White great problems: both the pawn f4 and e4 pawns are attacked, and 8.Bxb4 Qxb4+ results in a double attack against b2 and f4. After 7.Nc3 Black can either answer with 7...Bxc3+ 8.bxc3 or with 7...Qf6, simultaneously attacking c3 and f4.
 Pressure against the e3-pawn
In the Adler variation 3...Ng4 4.Nf3, after White has moved f2-f4, the e3-pawn becomes a backward pawn on an open file. Black can then apply pressure on the e-file in general, against the e3-pawn and the e4-square in particular. Typical moves in this plan would include the manoeuvre Ne5-d7-f6, followed by putting the heavy pieces on the e-file with Rf8-e8 and Qd8-e7 (see diagram at right). The Bc5 is already well placed to pressure the e3-pawn. Depending on circumstances, the Bc8 may be involved either on b7 or on f5, in both cases to assert control over the central e4-square.
This plan is viable only if certain conditions are met. The d7-square must be available for the Ne5, so that it can later transfer to f6. White should also not be able to easily advance the e3-pawn to e4, where it would be adequately defended by the Nc3 and a possible Bf3. Finally, White should not have the time to launch a quick attack on Black's castled position with the pawn thrust f4-f5-f6.
| a | b | c | d | e | f | g | h | ||
| 8 |
|
8 | |||||||
| 7 | 7 | ||||||||
| 6 | 6 | ||||||||
| 5 | 5 | ||||||||
| 4 | 4 | ||||||||
| 3 | 3 | ||||||||
| 2 | 2 | ||||||||
| 1 | 1 | ||||||||
| a | b | c | d | e | f | g | h | ||
In the main lines the pawn push c4-c5 often brings positional gains to White. In the Rubinstein variation 3...Ng4 4.Bf4 with 4...Nc6 5.Nf3 Bb4+ 6.Nbd2 Qe7 7.a3, after 7...Ngxe5 8.Nxe5 Nxe5 9.e3 Bxd2+ 10.Qxd2 (see diagram at right) White gets the bishop pair and a space advantage. In order to build up on these potential advantages, the most common plan is to perform a minority attack on the queenside, with the goal of performing the pawn advance c4-c5 in favourable conditions. This push can yield several advantages to White: it enhances the prospects of the light-square bishop, it creates a half-open file to attack with the rooks, and it creates an isolated, backward pawn on d6 after the exchange c5xd6.
For example, in the diagram on the right, after the natural but mistaken 10...0-0?! White can immediately realise his strategic goal with 11.c5! Then if Black accepts the temporary sacrifice after 11...Qxc5 12.Rc1 Qd6 13.Qxd6 cxd6 14.Rd1 White gets his pawn back and has created a weak pawn in d7, while if Black declines the pawn he has difficulties in developing his queenside (for example 11...d6 might be followed by 12.cxd6 Qxd6 13.Qxd6 cxd6 and the pawn on d6 is weak). Therefore Black generally tries to hinder the c4-c5 push with moves like d7-d6, b7-b6 or Rf8-d8 (if this creates a hidden vis-à-vis between the Rd8 and the Qd2).
Similarly, in the Rubinstein variation 3...Ng4 4.Bf4 with 4...Nc6 5.Nf3 Bb4+ 6.Nc3, after 6...Bxc3+ 7.bxc3 White is saddled with doubled pawns in c3 and c4 that limit the scope of his bishop pair. Hence the push c4-c5 can be used to free the light-squared bishop and disrupt Black's position.
In the Adler variation 3...Ng4 4.Nf3, after 4...Bc5 5.e3 Nc6 6.Be2 0-0 7.0-0 Re8 8.Nc3 Ngxe5 9.b3 a5 10.Bb2 Nxf3+ Bxf3 Ne5 12.Be2 Ra6 13.Qd5 Qe7 14.Ne4 Ba7 White has good reasons to push 15.c5. This move would close the diagonal of the Ba7. It would make it harder for Black to develop the Bc8 as pawn pushes like b7-b6 or d7-d6 may be answered respectively by cxb6 or cxd6, creating a weak pawn for Black. Also, the prospects of the Be2 would be enhanced.
1.d4 Nf6 2.c4 e5 3.dxe5 Ng4 4.Bf4 Nc6 5.Nf3 Bb4 6.Nbd2 Qe7 7.a3 Ngxe5 8.axb4 Nd3 #
| a | b | c | d | e | f | g | h | ||
| 8 |
|
8 | |||||||
| 7 | 7 | ||||||||
| 6 | 6 | ||||||||
| 5 | 5 | ||||||||
| 4 | 4 | ||||||||
| 3 | 3 | ||||||||
| 2 | 2 | ||||||||
| 1 | 1 | ||||||||
| a | b | c | d | e | f | g | h | ||
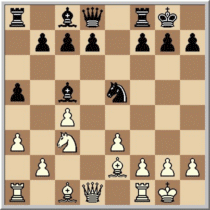
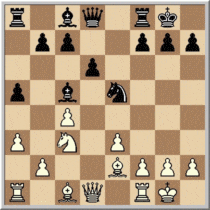
The Kieninger Trap is named after Georg Kieninger who used it in an offhand game against Godai at Vienna in 1925. It occurs in the Rubinstein variation 3...Ng4 4.Bf4 with 4...Nc6 5.Nf3 Bb4+ 6.Nbd2 Qe7 7.a3. The Bb4 is attacked but Black does not have to move it for the moment, and instead both regains the gambit pawn and sets a trap with 7...Ngxe5 (see diagram at right). Superficially, White seems to win a piece with 8.axb4??, but that would be falling into the Kieninger Trap because it would allow 8...Nd3 mate; even after the exchange 8.Nxe5 Nxe5, the threat of ...Nd3 mate remains and indirectly defends the Bb4 from capture.
A rare variant has also occurred in a miniature in the Fajarowicz variation, after the moves 1.d4 Nf6 2.c4 e5 3.dxe5 Ne4 4.Qc2 Bb4+ 5.Nd2 d5 6.exd6 Bf5 7.Qa4+ Nc6 8.a3 Nc5 9.dxc7 Qe7! when White, trying to save his queen, fell into 10.Qd1 Nd3 mate.
| a | b | c | d | e | f | g | h | ||
| 8 |
|
8 | |||||||
| 7 | 7 | ||||||||
| 6 | 6 | ||||||||
| 5 | 5 | ||||||||
| 4 | 4 | ||||||||
| 3 | 3 | ||||||||
| 2 | 2 | ||||||||
| 1 | 1 | ||||||||
| a | b | c | d | e | f | g | h | ||
1.d4 Nf6 2.c4 e5 3.dxe5 Ng4 4.Nf3
The Adler variation is named after the game Adler-Maróczy, played at the 1896 Budapest tournament. White is ready to return the e5-pawn in order to develop his pieces on their best squares, i.e. the d5-square for the Nb1, the f3-square for the Ng1 and the a1-h8 diagonal for the Bc1.
Black can try the minor line 4...Nc6 that delays the development of its dark-square bishop, to develop it along the a1-h8 diagonal instead of the a3-f8 diagonal, depending on the circumstances. But the main line is 4...Bc5 to attack the f2-pawn, forcing 5.e3, blocking in White's bishop on c1, so that after 5...Nc6 White will not have enough pieces to protect his e5-pawn in the long run. Placing the bishop on the c5-square also has subtler points, as Tseitlin explains:
At first sight the bishop on c5 lacks prospects, being held at bay by the pawn on e3, and is insecure in view of the threat to exchange it by Nc3-a4/e4. In reality, posting the bishop here has a deep strategic significance. It holds up the advance of the e- and the f-pawns (assuming the white bishop will go to b2), and thereby secures e5 as a future knight outpost, which in turn restricts the activity of both White's bishops. As to the exchanging threat, the bishop may conveniently retreat on a7 or f8, or even in some cases remain on c5 with support from a pawn on b6.
| a | b | c | d | e | f | g | h | ||
| 8 |
|
8 | |||||||
| 7 | 7 | ||||||||
| 6 | 6 | ||||||||
| 5 | 5 | ||||||||
| 4 | 4 | ||||||||
| 3 | 3 | ||||||||
| 2 | 2 | ||||||||
| 1 | 1 | ||||||||
| a | b | c | d | e | f | g | h | ||
An important theoretical decision for White is to choose whether to play a2-a3. While this move protects the b4 square and threatens the pawn advance b2-b4, it encourages Black's rook lift Ra8-a6-h6. As Lalic puts it:
It was not so long ago that 8.a3, with the obvious intention of expanding with b2-b4, was the standard move. However, after Black responds with the logical a7-a5, it became apparent in tournament practice that the inclusion of these moves is in fact in Black's favour, as it gives his queen's rook access into play via the a6-square.
1.d4 Nf6 2.c4 e5 3.dxe5 Ng4 4.Nf3 Bc5 5.e3 Nc6 6.a3
| a | b | c | d | e | f | g | h | ||
| 8 |
|
8 | |||||||
| 7 | 7 | ||||||||
| 6 | 6 | ||||||||
| 5 | 5 | ||||||||
| 4 | 4 | ||||||||
| 3 | 3 | ||||||||
| 2 | 2 | ||||||||
| 1 | 1 | ||||||||
| a | b | c | d | e | f | g | h | ||
The opinion of the move 6.a3 has gradually shifted from being the main continuation to being a possible continuation, then down to its present status of being considered a mistake. The threat to push b2-b4 must be taken seriously by Black, who typically answers 6...a5. But in the 1980s it was discovered that the push a7-a5 was actually a very useful one for Black, as it allows the Ra8 to be developed along the sixth rank. Meanwhile, the push a2-a3 is less useful for White, as he will not be able to easily push b2-b4. As Tseitlin puts it, "the point is that 6...a5 fits into the plan of attacking White's kingside, whereas 6.a3 does little in the way of defending it". Thus if White does not find a clear way to make good use of his move a2-a3, it may turn out to be a critical waste of tempo.
After the topical moves 7.b3 0-0 8.Bb2 Re8 9.Nc3 Ngxe5 10.Nxe5 Nxe5 11.Be2 Black has regained the invested pawn. White has a space advantage in the centre and can initiate pressure here or on the queenside by pawn pushes like b3-b4 and c4-c5 (possibly supported by a knight on the d5-square). Meanwhile, the white king lacks defenders so Black can start a pieces-driven attack with the rook lift 11...Ra6 (see section "Budapest rook"). The stem game continued with 12.Nd5 Rh6 13.Bd4 d6 14.Ra2 Bf5 15.Bxc5 dxc5 and Black won in 26 moves. To avoid such an unfavourable development, White players have changed the move-order to keep the Bc1 on its original square as long as possible, so that it can help the defence. Thus, the typical move-order became 7.b3 0-0 8.Nc3 Re8 9.Be2 Ngxe5 10.Nxe5 Nxe5 11.0-0 when 11...Ra6 would be met with 12.Nd5 Rh6 13.e4 immediately attacking the maveric rook. So Black usually opts for 11...d6, forgetting about the Ra8-a6-h6 manoeuvre. After 12.Bb2 ECO considers the situation as favourable to White, but Tseitlin thinks Black still has a lot of possibilities (e.g. the other rook lift Re8-e6-h6), so that "the struggle still lies ahead".
| a | b | c | d | e | f | g | h | ||
| 8 |
|
8 | |||||||
| 7 | 7 | ||||||||
| 6 | 6 | ||||||||
| 5 | 5 | ||||||||
| 4 | 4 | ||||||||
| 3 | 3 | ||||||||
| 2 | 2 | ||||||||
| 1 | 1 | ||||||||
| a | b | c | d | e | f | g | h | ||
1.d4 Nf6 2.c4 e5 3.dxe5 Ng4 4.Nf3 Bc5 5.e3 Nc6
By refraining from the advance a2-a3 White tries to gain a tempo on the lines of the previous section, making it more difficult for Black to initiate the Re8-e6-h6 or Ra8-a6-h6 lifts. After the moves 6.Be2 0-0 7.0-0 Re8 8.Nc3 Ngxe5 9.Nxe5 Nxe5 White has tried two different plans.
The older one sees White attack in the centre with moves like b2-b3, Bc1-b2, Qd1-d5, Nc3-e4 and c4-c5. White gets an important space advantage in the centre, but Black can attack the kingside with rook lifts. After 10.b3 a5 White can try to capture the Bc5 with 11.Na4 or 11.Ne4, one point being that the retreat 11...Ba7 would lock the Ra8 because Black has not played Ra8-a6 already. Lalic still thinks 11...Ba7 is the right move after 11.Ne4 due to the importance of the a7-g1 diagonal, but Black can also reroute the bishop with 11...Bf8 and "White has no obvious path to even a minute advantage". After 11.Na4 Black can also simply react by 11...b6 when the loss of the bishop pair is compensated by the semi-open b-file and improved control of the central squares. Tseitlin considers that after the exchange on c5 Black has the better position. Hence the main continuation is 11.Bb2, keeping the knight jumps for later. Then the most common plan for Black is a rook lift: the plan Ra8-a6-h6 was tried in the much-commented game Åkesson-Tagnon (Berlin Open 1984). Black duly won, but after the game continuation 11...Ra6 12.Qd5! Qe7 13.Ne4 Ba7 14.c5 Rg6 15.Rac1 Bb8 16.f4 authors do not agree on which side had the advantage. Borik and Tseitlin both consider White to have a positional advantage, with Tseitlin recommending instead 15...Nc6!, with dangerous threats. However Lalic writes of 15...Bb8, "it is true that the bishop pair looks a bit pathetic lined up on the back rank just now, but there is no way to stop them breaking out later".
The second plan for White, unveiled by Spassky in 1990, aims at a kingside blitzkrieg with moves like Kg1-h1, f2-f4, Be2-d3 and Qd1-h5. In the original game Black did not fathom White's idea, so that after 10.Kh1 a5?! 11.f4 Nc6 12.Bd3 d6 13.Qh5! h6 14.Rf3 Black's pieces were ill-placed to counter White's attack. A more principled plan for Black is to react in the centre, specifically targeting the backward e3-pawn and e4-square. After 10.Kh1 d6 11.f4 Nd7! 12.Bd3 Nf6 13.Qf3 Ng4 14.Nd1 f5! and Black has succeeded in inhibiting White's e3-e4 expansion . As Black was doing fine with the 11.f4 move-order, White has been searching for a new path with 10.Kh1 d6 11.Na4!? b6! 12.Bd2 a5 13.Nxc5 bxc5 14.f4 Nd7 15.Bf3 when Jeremy Silman prefers White. White has even dared the immediate 10.f4 Nc6 11.Bd3 when it is extremely dangerous for Black to take the offered e3-pawn, as White gets a fierce kingside attack for free.
| a | b | c | d | e | f | g | h | ||
| 8 |
|
8 | |||||||
| 7 | 7 | ||||||||
| 6 | 6 | ||||||||
| 5 | 5 | ||||||||
| 4 | 4 | ||||||||
| 3 | 3 | ||||||||
| 2 | 2 | ||||||||
| 1 | 1 | ||||||||
| a | b | c | d | e | f | g | h | ||
1.d4 Nf6 2.c4 e5 3.dxe5 Ng4 4.Bf4
This move sequence is called the "Rubinstein variation" in reference to the famous game Rubinstein-Vidmar (Berlin 1918) when 4.Bf4 was first employed. Various authors consider this move to be the most dangerous for Black. It aims to answer 4...Bc5 with 5.e3 without blocking the Bc1, contrary to what happens in the Adler variation 4.Nf3. Another point is that in the Adler variation White faces the risk of a strong attack against his kingside (see section "Budapest rook"), while in the 4.Bf4 variation this is seldom the case because the Bf4 is well placed to protect White's kingside. On the other hand, the early development of the bishop means that White is more vulnerable to the check Bf8-b4+, the b2-pawn is not defended, and in some rare cases the Bf4 can become subject to attack.
Apart from the sideline 4...g5, the main line continues with both players developing their pieces around the e5-pawn with 4...Nc6 5.Nf3 Bb4+ when White has an important choice between the moves 6.Nc3 and 6.Nbd2, each leading to extremely different play. With 6.Nc3 White acquiesces to the breakup of his queenside pawns in return for a material advantage of one pawn, the bishop pair and active play in the centre. With 6.Nbd2 White gives back the gambited pawn to keep a healthy pawn structure and acquire the bishop pair. After 6.Nbd2 Qe7 White generally plays 7.a3 to force the immediate exchange of bishop for knight, gaining the bishop pair, a spatial advantage and chances for a minority attack on the queenside. White can also try 6.Nbd2 Qe7 7.e3 to win a tempo over the 7.a3 variation, though he may end up with the exchange at d2 made in less favourable circumstances, or not at all. The maverick gambit 6...f6 also exists.
| a | b | c | d | e | f | g | h | ||
| 8 |
|
8 | |||||||
| 7 | 7 | ||||||||
| 6 | 6 | ||||||||
| 5 | 5 | ||||||||
| 4 | 4 | ||||||||
| 3 | 3 | ||||||||
| 2 | 2 | ||||||||
| 1 | 1 | ||||||||
| a | b | c | d | e | f | g | h | ||
1.d4 Nf6 2.c4 e5 3.dxe5 Ng4 4.Bf4 g5
The sideline 4...g5!? was not well regarded at the end of the 20th century. It weakens several squares - particularly f5 and h5 - as they cannot be covered by the g-pawn any more. White can try to exploit these weaknesses with the manoeuvres Bf4-d2-c3 (pressure along the diagonal a1-h8), Ng1-e2-g3-h5 (pressure against the squares f6 and g7) and h2-h4 (to open the h-file). Nonetheless, the 4...g5 line has found new supporters in recent years thanks to black wins against both 5.Bg3 and 5.Bd2.
For years, the reaction 5.Bg3 was not well considered, because the retreat does not make the most out of Black's provocative fourth move; as Tseitlin points out, "the bishop is in danger of staying out of play for a long time". But later Lalic found that 5.Bg3 was "just as effective" as 5.Bd2. Black concentrates on capturing the e5-pawn while White tries to get an advantage from the weakening of the black kingside. After the typical moves 5...Bg7 6.Nf3 Nc6 7.Nc3 Ngxe5 8.Nxe5 Nxe5 9.e3 d6 Lalic considers the best try to be 10.c5!, sacrificing a pawn to weaken Black's control on the e5-square and expose the black king further. White has also tried to quickly open the h-file with 7.h4 Ngxe5 8.Nxe5 Nxe5 9.e3 but after 9...g4! Black succeeds in keeping the file closed.
The alternative to 5.Bg3 is 5.Bd2 to place the bishop on the wide-open diagonal a1-h8, after which "White can expect a safe advantage". Then according to Lalic, delaying the recapture with 5...Bg7 6.Bc3 Nc6 7.e3 Ngxe5 is not correct as White can gain an advantage by 8.h4 or 8.Qh5, so the immediate 5...Nxe5 is better. For some time 6.Bc3 was well considered because Black had problems dealing with various positional threats, but the correct way for Black was found in 5...Nxe5 6.Bc3 Qe7 7.e3 Rg8! 8.Nf3 Nbc6 9.Be2 d6 10.Nd4 Bd7 11.b4 g4 with good counterplay for Black on the kingside. White's efforts then switched to 6.Nf3 to open the e-file, something that Black cannot really avoid, as 6...Bg7 7.Nxe5 Bxe5 8.Bc3 would leave an advantage to White. For example 8...Qe7 9.Bxe5 Qxe5 10.Nc3 d6 11.e3 and Black is at a loss for an equalising line, White's advantage consisting in his ability to install his knight on the strong d5-square and to attack the weakened Black's kingside with the advance h2-h4. It is better for Black to continue with 6...Nxf3+ 7.exf3 when both 7...h5? and 7...Bg7 would fail to 8.Qe2+, so Black must try 7...d6 8.Qe2+ Be6 instead.
| a | b | c | d | e | f | g | h | ||
| 8 |
|
8 | |||||||
| 7 | 7 | ||||||||
| 6 | 6 | ||||||||
| 5 | 5 | ||||||||
| 4 | 4 | ||||||||
| 3 | 3 | ||||||||
| 2 | 2 | ||||||||
| 1 | 1 | ||||||||
| a | b | c | d | e | f | g | h | ||
1.d4 Nf6 2.c4 e5 3.dxe5 Ng4 4.Bf4 Nc6 5.Nf3 Bb4+ 6.Nc3
This is the only important line in the Budapest where Black is not ensured of regaining his sacrificed pawn. Black does best to immediately exchange the Nc3 with 6...Bxc3+ 7.bxc3 as otherwise White gets a small positional advantage simply by avoiding the doubled pawns (see the section "Advantages of ...Bb4+"). Then Black can put pressure on the e5-pawn with 7...Qe7 when White's only possibility to keep the pawn is 8.Qd5. White threatens to ease the pressure with the move h2-h3 that would force the Ng4 to the unfavourable square h6, so Black's only possibilities to sustain the initiative are 8...Qa3 and 8...f6.
The line 8...Qa3 puts pressure on the white queenside pawns, pressure that may later be intensified with Nf6-e4. The black queen also gains access to the a5-square, from where it puts pressure on the e1-a5 diagonal aimed towards the white king. After 9.Rc1 f6 10.exf6 Nxf6 11.Qd2 d6 12.Nd4 0-0 we reach the position of the famous game between Rubinstein and Vidmar, when Rubinstein erred with 13.e3? and later lost. After the better 13.f3 the correct method for Black is to target the c4-pawn with the regrouping Ne5/Qc5. Hence Lalic thinks 11.Qd2 is inappropriate and gives Black excellent counterplay, and prefers 11.Qd3 or even 11.Qd1!? After 11.Qd3 0-0 12.g3 d6 13.Bg2 Black should switch to a materialistic mode with 13...Qxa2.
In the other line 8...f6 Black does not want to decentralise his queen and prefers to concentrate on active piece play in the centre. After 9.exf6 Nxf6, 10.Qd1, 10.Qd2 and 10.Qd3 are all possible, but each has its drawbacks: on d1 the queen is not developed, on d3 it is exposed to Bc8-f5 and on d2 it is exposed to Nf6-e4. Lalic considers 10.Qd3 to be the main move, qualifies 10.Qd1 as a "respectable option", but considers 10.Qd2 as "inaccurate". Meanwhile, Black will try to create counterplay by attacking either the weak c4-pawn, or the kingside with g7-g5 and h7-h5. In both cases a key possibility is the move Nf6-e4 that centralises the knight, attacks the weak c3-pawn, controls the c5-square and supports the g7-g5 thrust.
| a | b | c | d | e | f | g | h | ||
| 8 |
|
8 | |||||||
| 7 | 7 | ||||||||
| 6 | 6 | ||||||||
| 5 | 5 | ||||||||
| 4 | 4 | ||||||||
| 3 | 3 | ||||||||
| 2 | 2 | ||||||||
| 1 | 1 | ||||||||
| a | b | c | d | e | f | g | h | ||
1.d4 Nf6 2.c4 e5 3.dxe5 Ng4 4.Bf4 Nc6 5.Nf3 Bb4+ 6.Nbd2 Qe7 7.a3
The Bb4 is attacked but Black can play 7...Ngxe5 to get the gambitted pawn back, as 8.axb4?? would allow the Kieninger trap 8...Nd3 mate (see the section "Kieninger trap"). Now White is more or less forced to exchange a pair of knights with 8.Nxe5 Nxe5. White still cannot win a piece with 9.axb4?? Nd3# or 9.Bxe5?! Bxd2+ 10.Qxd2 Qxe5, so he usually plays 9.e3 in order to protect the c4-pawn and defuse the mating threat, so that now Black is obliged to move his Bb4. As 9...Bd6 would misplace the bishop and 9...Ba5?? would lose the bishop to 10.b4 Bb6 11.c5, Black usually plays 9...Bxd2+ 10.Qxd2.
After 10.Qxd2, Tseitlin explains that "opening manuals assess this position as favourable to White on the basis of the bishop pair. However, considering the closed nature of the position, White faces substantial difficulties in the realisation of this nominal advantage." Black has not a lot of things to be proud of as there are no targets in White's camp, but can put up a lot of resistance thanks to small assets. Black's Ne5 is strongly centralised, attacks the c4-pawn, and restricts the Bf1 from moving to the natural squares d3 and f3. Moreover, exchanging the knight with Bxe5 is not appealing for White, since that would mean losing the advantage of the bishop pair. Also, the Bc8 can sometimes become better than its counterpart the Bf1, if it makes it to the good squares b7 or c6 while the Bf1 remains restricted by the Ne5.
This explains the most natural plans for both sides. White will try a minority attack on the queenside, in order to increase its space advantage and to create some weaknesses in the black pawns (e.g. an isolated pawn or a backward pawn). So White will try to use the advances b2-b4 or c4-c5 in good conditions, supported by the queen and the rooks on the c-file and the d-file. On the other hand, Black will try to keep the position closed, most importantly by keeping the c4-pawn where it is in order to keep the Bf1 at bay. This can be achieved by moves like b7-b6 and d7-d6, and sometimes the manoeuvre Ne5-d7-f8-e6. The first move by Black has to be 10...d6! because otherwise White plays 11.c5! and gets a clear advantage immediately. For example 10...b6? loses a pawn to 11.Qd5 Nc6 12.Bxc7, and 10...0-0?! is bad because of 11.c5! Qxc5? 12.Rc1 Qe7 13.Rxc7 and White is winning already.
International Master Timothy Taylor has suggested an alternative for Black on move 9. He regards 9...Bxd2+ as inferior, arguing that "the strong black bishop is traded for the inoffensive knight, and white gets the long-term advantage of the two bishops in a semi-open game". Taylor instead advocates 9...Bc5, when Black stands well after 10.b4 Bd4! (11.exd4?? Nd3#) 11.Rb1 d6 12.Be2 Bf5 13.Rb3 Ng6 14.Bg3 (14.exd4 Nxf4 15.Re3? Nxg2+ wins; 14.Bxd6 exd6 15.exd4 Nf4 16.g3 Bc2! wins material) Bf6; 10.Ne4 Ng6; 10.Nb3 Bd6; or 10.Be2 d6.
| a | b | c | d | e | f | g | h | ||
| 8 |
|
8 | |||||||
| 7 | 7 | ||||||||
| 6 | 6 | ||||||||
| 5 | 5 | ||||||||
| 4 | 4 | ||||||||
| 3 | 3 | ||||||||
| 2 | 2 | ||||||||
| 1 | 1 | ||||||||
| a | b | c | d | e | f | g | h | ||
1.d4 Nf6 2.c4 e5 3.dxe5 Ng4 4.Bf4 Nc6 5.Nf3 Bb4+ 6.Nbd2 Qe7 7.a3 Ngxe5 8.Nxe5 Nxe5 9.e3 Bxd2+ 10.Qxd2 d6
After 10...d6! White can try (and has tried) about any move that supports the aforementioned plan. In particular, White has to choose if he wants to start active operations on the queenside immediately (e.g. Rc1, Qc3, c5), or if he wants to finish his development first (with Be2 and 0-0). The immediate 11.c5!? is a possible pawn sacrifice in order to open some diagonals for the bishops. As Lalic points out, "after 11...dxc5 Black's knight on e5 has lost its support and therefore all tactical motifs based on Qd5 and Bb5+ must be carefully checked". White gets a powerful attack for his pawn but nothing decisive. The same idea can be tried with the preparatory 11.Rc1, and after 11...0-0 12.c5!? dxc5 13.Qd5 Ng6 14.Bg3 White should be reminded that he has not finished his development with 14...Qf6! and a counter-attack on the b2-pawn. Playing Black, Svidler chose a different path with 11...b6 but his opponent Lesiège nevertheless sacrificed the pawn with 12.c5! bxc5 13.b4 0-0 14.bxc5 Bb7 15.f3 and Svilder chose to destroy his own pawn structure with 15...dxc5!? to activate his pieces and make use of the d-file. The most popular move is 11.Be2, where White delays his queenside play until he has achieved castling. It also gives Black more time to organise a defence on the queenside with b7-b6, either now or after 11...0-0.
| a | b | c | d | e | f | g | h | ||
| 8 |
|
8 | |||||||
| 7 | 7 | ||||||||
| 6 | 6 | ||||||||
| 5 | 5 | ||||||||
| 4 | 4 | ||||||||
| 3 | 3 | ||||||||
| 2 | 2 | ||||||||
| 1 | 1 | ||||||||
| a | b | c | d | e | f | g | h | ||
1.d4 Nf6 2.c4 e5 3.dxe5 Ng4 4.Bf4 Nc6 5.Nf3 Bb4+ 6.Nbd2 Qe7 7.e3
In this variation White tries to avoid the move a2-a3 in order to gain a tempo over the 7.a3 variation. After the standard moves 7...Ngxe5 8.Nxe5 Nxe5 9.Be2 followed by 10.0-0 it is Black's last chance to exchange the Bb4 for the Nd2. The game will take an entirely different structure depending on whether Black gives up the bishop pair or tries to keep it.
Lalic thinks the strategies in which Black gives up the bishop pair (by exchanging its Bb4 for the Nd2) for nothing are a mistake. He does not like the strategy to retreat the Bb4 in d6 either, because they are too drawish. He recommends the strategy to retreat the bishop in c5, and maintain its position there with the help of the a7-a5 pawn advance.
When Black opts for 10...Bxd2, he runs the risk to end up a tempo down over the 7.a3 variation and to be soon unable to meet White's positional threats on the queenside. White can avoid the push a2-a3 and continue with the standard plans of the 7.a3 variation. However, everything is not that bad for Black. First, to implement his plan White has to concentrate on development (9.Be2, 10.0-0) before he turns his attention to the queenside. That means Black has more time to organise his play than in the 7.a3 variation, notably to attempt a blockade of the c5-square. Moreover, as White does not put immediate pressure on Black's position, Black is not compelled to castle rapidly and he can keep his king in the centre for a longer time, or even castle queenside. Hence Lalic note that "White has not wasted time with a2-a3, but in fact it is not so easy to capitalise on this extra tempo."
A possibility for Black is to develop his light-square bishop rapidly, by prioritising the moves b7-b6 and Bc8-b7 over castling and d7-d6. The game Solozhenkin-Stiazhkin (Leningrad 1990) continued with 9...b6 10.0-0 Bxd2 11.Qxd2 Bb7 12.c5 bxc5 13.Qa5 d6 14.Bxe5 dxe5 15.Rfc1 and Moskalenko assesses this position as better for White; Lalic suggests that 13...Ng6 is an improvement. In the game Gausel-Reite (Norwegian Team Championship 1991), after the same 9.Be2 b6 10.0-0 Bxd2 11.Qxd2 Bb7 Black introduced a highly original plan by avoiding the natural advance d7-d6, and instead blocked a white c5-push by playing ...c5 himself. The game continued 12.Qc3 f6 13.b4 c5!? and Lalic was "deeply impressed by this plan, which really spoils all of White's fun". The c4-pawn is never allowed to advance, so that the Be2 is durably restricted. The Bf4 is obstructed by the Ne5, that cannot be easily removed. The weakness of the d7-pawn is not a worry as it can be protected by Bb7-c6 if necessary.
| a | b | c | d | e | f | g | h | ||
| 8 |
|
8 | |||||||
| 7 | 7 | ||||||||
| 6 | 6 | ||||||||
| 5 | 5 | ||||||||
| 4 | 4 | ||||||||
| 3 | 3 | ||||||||
| 2 | 2 | ||||||||
| 1 | 1 | ||||||||
| a | b | c | d | e | f | g | h | ||
After 9.Be2 0-0 10.0-0 Black can avoid the immediate exchange of his Bb4 against the Nd2 in several ways. The first one, resurrected and elaborated by the grandmaster Pavel Blatny, is to exchange the Bb4 for the Bf4. This can be achieved via 10...Ng6 11.Bg3 (11.Bxc7?? d6 loses a piece) 11...Bd6 12.Bxd6 Qxd6. White still has possibilities to play for an advantage due to his more advanced development, his space advantage on the queenside and the possibility to install his knight on the good square d5. Taylor considers this Black's best line, stating that Black has not given White the bishop pair, nor weakened his pawn structure, and should be able to gradually equalize.
The other possibility for Black is to keep his Bb4 as long as possible, exchanging it against the white knight only in favourable circumstances. A couple of attempts have been done with this in mind, with subtle variations along the moves a7-a5, b7-b6 and d7-d6. Against the mundane 10...d6 White can continue with 11.Nb3 (see diagram at right) to play on the queenside against the exposed Bb4, or 11.Nb1 to recycle the knight on the ideal d5-square. Another idea is the immediate 10...a5, to have the d6-square for the bishop, inhibit the b2-b4 push and have the possible a5-a4 pawn advance if the white knight moves to b3. In the game Mikhalevski-Chabanon (Bad Endbach 1995) Black kept the bishop with 11.Nb3 a4 12.a3 Bd6 13.Nd4 Bc5 14.Nb5 d6 15.Nc3 Ng6 16.Bg3 f5 and had dynamic play.
| a | b | c | d | e | f | g | h | ||
| 8 |
|
8 | |||||||
| 7 | 7 | ||||||||
| 6 | 6 | ||||||||
| 5 | 5 | ||||||||
| 4 | 4 | ||||||||
| 3 | 3 | ||||||||
| 2 | 2 | ||||||||
| 1 | 1 | ||||||||
| a | b | c | d | e | f | g | h | ||
With 4...Bb4+ 5.Nbd2 d6 (see diagram at right) Black wants to open the diagonal a1-h8 for his queen. After 6.exd6 Qf6 White can react to the attack on his Bf4 in several ways, the best one being 7.Nh3 to develop a piece and protect both the Bf4 and the f2-pawn. It also helps that the Bf4 is still guarding the Nd2, so that after 7...Qxb2? there is not the threat of winning the exchange (8...Bxd2+ would be answered by 9.Bxd2) and White can repel Black's attack with 8.Rb1 Qa3 9.Rb3 Qa5 10.dxc7 Nc6 11.a3! Be7 12.e3. Instead, Black must play energetically with 7...Nxf2 8.Kxf2 Bxh3 9.g3 Bxf1 10.dxc7!? Nc6 11.Rxf1 and here Lalic recommends 11...0-0 12.Kg2 Rfe8.
The other gambit, 4...Nc6 5.Nf3 Bb4+ 6.Nbd2 f6 7.exf6 Qxf6, is much riskier, as Black weakens his kingside and does not open a diagonal for his Bc8. Black tries to take advantage of the fact White has moved his dark-squared bishop away from the queenside, leaving the b2-pawn without protection. The correct plan for White was shown by Gleizerov who played 8.e3 Qxb2 9.Be2 d6 10.0-0 0-0 11.Nb3 Qf6 12.c5! to open the a2-g8 diagonal that was weakened precisely by the gambit move 6...f6. The move 11.Nb3 is not only useful to support the c4-c5 push, but also to exchange the knight against Black's dark-squared bishop after a possible a2-a3 forcing the retreat Bb4-c5. As Lalic puts it, "I doubt if Black has a satisfactory answer to White's play in this game".
| a | b | c | d | e | f | g | h | ||
| 8 |
|
8 | |||||||
| 7 | 7 | ||||||||
| 6 | 6 | ||||||||
| 5 | 5 | ||||||||
| 4 | 4 | ||||||||
| 3 | 3 | ||||||||
| 2 | 2 | ||||||||
| 1 | 1 | ||||||||
| a | b | c | d | e | f | g | h | ||
1.d4 Nf6 2.c4 e5 3.dxe5 Ng4 4.e4
This variation is named after Alekhine thanks to his wins in the games Alekhine-Rabinovic (Baden Baden, 1925) and Alekhine-Seitz (Hastings, 1926). White does not try to keep its material advantage (the e5-pawn) and concentrates on establishing a strong pawn center and space advantage. A controversial point is whether the typical black manoeuvre Bf8-b4-xc3 is advantageous for Black (as it saddles White with doubled pawns) or for White (as it reinforces his centre). Lalic thinks both, considering 6...Bb4+ to be a bad move after 4...Nxe5 5.f4 Nec6 6.Nf3, but a good one after 4...Nxe5 5.f4 Nec6 6.Be3. After 4.e4 the main line is 4...Nxe5 5.f4 when Black has an important choice to make about where to move the Ne5. The retreat to the queenside with 5...Nec6 is considered best, while the retreat to the kingside with 5...Ng6 is probably playable.
Taylor considers 4...Nxe5 inferior, recommending instead a rarely played idea of Richard Réti, 4...h5! (Taylor's exclamation point). Then 5.Nf3 would allow 5...Bc5, while Taylor suggests meeting 5.Be2 with 5...Nc6! and 5.f4 with 5...Bc5 with quick development compensating for the lost pawn. He considers the main line to be 4...h5 5.h3 Nxe5 6.Be3 Bb4+, with good play for Black.
| a | b | c | d | e | f | g | h | ||
| 8 |
|
8 | |||||||
| 7 | 7 | ||||||||
| 6 | 6 | ||||||||
| 5 | 5 | ||||||||
| 4 | 4 | ||||||||
| 3 | 3 | ||||||||
| 2 | 2 | ||||||||
| 1 | 1 | ||||||||
| a | b | c | d | e | f | g | h | ||
1.d4 Nf6 2.c4 e5 3.dxe5 Ng4 4.e4 Nxe5 5.f4 Nec6
The Knight on c6 is safer than on g6, and is well-placed as part of a general strategy to control the central dark squares. It can go to d4 while the other Knight can go to c5 via a6 or d7. After 6.Nf3 Bc5 White has difficulties castling short, because the plan to exchange the dark-squared bishops with Bd3/Qe2/Be3 can be met by Bg4/Nd4 to muddy the waters. As Lalic points out:
White can no longer castle kingside and will usually have to go the other way. However, this is rather slow and gives Black time to try to undermine the white centre. To this end Bc8-g4 often comes in handy, in order to pin the white knight on f3 against the white queen. Note that Black should wait until his opponent has wasted a tempo with Qe2.
The main continuation 6.Be3 controls the a7-g1 diagonal and is considered to be the best reply. If Black wants to contest the c5-square for his Bf8 he can try 6...Na6, but most games continue with 6...Bb4+. Here the best reply for White is controversial.
After 7.Nc3 Black has the zwischenzug 7...Qh4+ 8.g3 Bxc3+ 9.bxc3 Qe7 so that the diagonal a8-h1 is weakened before Black develops the Bc8 to the b7-square. The queen on the e7-square is well placed to pressure the e4-pawn. However, as most of Black's pieces are on the queenside, continuing with pawn pushes like f7-f5 is probably too weakening, as Alekhine demonstrated in his game against Seitz in 1925. So Black does best to attack with pieces, possibly with the setup b6/Nc5/Bb7/0-0-0. In that case Tseitlin considers that with a knight on c5 the move d7-d6 should be avoided if Black has to respond to the capture Bxc5 by dxc5, because the white pawns in e4 and f4 would have too much leeway.
After 7.Nd2 Qe7 8.a3 Lalic considers 8...Qxe4 should be avoided, e.g. the continuation 9.Kf2 Bxd2 10.Qxd2 0-0 11.Nf3 d6 12.Re1 gives White several tempi against the black queen. After the better 8...Bc5 9.Bxc5 Qxc5 10.Qf3 Lalic recommends 10...a5. The introduction of the intermediate 7...Qh4+ 8.g3 Qe7 does not change Lalic's opinion, as after 9.Bg2 Na6 10.a3 Bc5 11.Bxc5 Nxc5 12.b4 Ne6 the bishop was well placed on g2 and Black experienced difficulties developing the Bc8. But Lalic does not mention the game Pomar-Heidenfeld cited by Borik, in which Black played the advance a7-a5 to restrict the white advance b2-b4, and achieved equality after 9.Bg2 a5 10.Ne2 Na6. Instead, he recommends 7...d6 8.Nf3 0-0 9.Bd3 and now the same development as in Pomar's game:
9...a5 and 10...Na6 deserves attention, when White's movements on the queenside are more restricted and the black knight will be able to settle on the c5-square without being kicked by the thematic b2-b4. It may appear that we have reached the same position elaborated in previous games a tempo down for Black, since he has committed his bishop to b4 and will later drop back to the c5-square instead of heading there at once. However, the white knight is less actively placed on d2 and in fact this fully compensates Black for the slight loss of time.
| a | b | c | d | e | f | g | h | ||
| 8 |
|
8 | |||||||
| 7 | 7 | ||||||||
| 6 | 6 | ||||||||
| 5 | 5 | ||||||||
| 4 | 4 | ||||||||
| 3 | 3 | ||||||||
| 2 | 2 | ||||||||
| 1 | 1 | ||||||||
| a | b | c | d | e | f | g | h | ||
1.d4 Nf6 2.c4 e5 3.dxe5 Ng4 4.e4 Nxe5 5.f4 Ng6
The Knight on g6 puts the f4-pawn under pressure, but may be embarrassed later by the pawn thrust f4-f5. Now 6.a3, an attempt to deny squares from the Bf8 by continuing with b2-b4 or Bc1-e3, does not achieve its goal after 6...Bc5! 7.b4?! Bxg1! 8.Rxg1 0-0! 9.Qf3 d6 10.g4 a5 11.b5 Nd7 12.Ra2 Nc5 when Black's superior pawn structure and well-positioned Nc5 gives him the advantage. That leaves White with the choice between 6.Nf3 and 6.Be3.
The move 6.Nf3 controls the e5-square in order to prepare the push f4-f5. Unlike after 5...Nec6, White does not have to fear 6...Bc5?!, which encounters difficulties after 7.f5! Nh4 8.Ng5!, when the black knight is already in danger of being lost to Qd1-g4 or Qd1-h5. Instead Black must react quickly with 6...Bb4+ 7.Nc3 when he can adopt a normal setup with d6/0-0/Nc6/b6 or act boldly with 7...Qf6 threatening both the Nc3 and the f4-pawn. One point in favour of 7...Qf6 is that after 8.e5 Qb6 the black queen prevents White from castling short and is well placed if White castles long.
The move 6.Be3 takes the a7-g1 diagonal from Black's Bf8 and may in some lines prepare the long castle. After the mandatory 6...Bb4+ White can opt for 7.Nd2 to avoid having doubled pawns, but he must be prepared to sacrifice a pawn after 7...Qe7 8.Kf2!? Bxd2 9.Qxd2 Qxe4 10.Bd3 with piece activity for the pawn deficit, because the normal defence 8.Bd3? runs into 8...Qd6! and both the Bd3 and the f4-pawn are attacked. White does not need, however, bother too much about the doubled pawns and after 7.Nc3 Bxc3+ 8.bxc3 a peaceful black player might choose the quiet 8...b6!? followed by a normal development with d6/0-0/Bb7/Nd7/Re8/Nc5. Instead of 8...b6 a more adventurous black player could choose 8...Qe7 9.Bd3 f5!? as indicated by Borik, Tseitlin and Lalic, but in his more recent book Moskalenko thinks "this move complicates the game too much". If the black player is neither peaceful nor aggressive, Lalic proposes an alternative with 8...Qe7 9.Bd3 0-0 10.Qd2 and only now that Black has his king safe shall he unleash 10...f5!?, when "it is not so easy for White to meet [10...f5] as the two main responses, 11.e5 and 11.exf5, allow Black promising chances with 11...d6 and 11...Nxf4 respectively".
| a | b | c | d | e | f | g | h | ||
| 8 |
|
8 | |||||||
| 7 | 7 | ||||||||
| 6 | 6 | ||||||||
| 5 | 5 | ||||||||
| 4 | 4 | ||||||||
| 3 | 3 | ||||||||
| 2 | 2 | ||||||||
| 1 | 1 | ||||||||
| a | b | c | d | e | f | g | h | ||
| a | b | c | d | e | f | g | h | ||
| 8 |
|
8 | |||||||
| 7 | 7 | ||||||||
| 6 | 6 | ||||||||
| 5 | 5 | ||||||||
| 4 | 4 | ||||||||
| 3 | 3 | ||||||||
| 2 | 2 | ||||||||
| 1 | 1 | ||||||||
| a | b | c | d | e | f | g | h | ||
1.d4 Nf6 2.c4 e5 3.dxe5 Ne4 The Fajarowicz variation is said to have its origins in the chess circles from Leipzig, with the first important game being H.Steiner-Fajarowicz at the 1928 Wiesbaden tournament. In this variation, Black makes no immediate effort to regain the gambit pawn, preferring to concentrate on active piece play and tactical tricks.
The move 4.a3 allows White to avoid the annoying bishop check on b4, the also annoying knight jump to b4, and prepares Qc2 to undermine Black's knight. Both Lalic and de Firmian consider it to be White's best move, with de Firmian assessing it as leading to a large advantage for White. Lalic considers 4...b6!? to be the best answer, one point being that Qd1-c2, so effective in most of the other lines, can be met by Bc8-b7. After 5.Nd2 Bb7 6.Qc2 Lalic gives 6...Nxd2 7.Bxd2 a5! when the black bishops will be excellently placed on the b7- and c5-squares. Lalic recommends 6.Nf3 instead, while de Firmian continues by 5.Nf3 Bb7 6.Nbd2 Qe7 7.Qc2 with a large advantage for White.
The move 4.Nf3 develops a piece and covers the sensitive d2-square. After 4...Bb4+ 5.Nbd2 Nc6 6.a3 Black can easily get confused by the move-order. The natural 6...Nxd2 7.Bxd2 Bxd2+ 8.Qxd2 Qe7 9.Qc3 transposes in the same position as after 5.Bd2, but White can also try 6...Nxd2 7.axb4! Nxf3+ 8.gxf3 Nxe5 9.Rg1 Qe7 10.Ra3! with a strong initiative. White can even retain his bishop with 6...Nxd2 7.Nxd2 and now Borik recommends 7...Bf8 with difficult play for Black as he is not certain to gain his pawn back. To avoid these possibilities Lalic advises the move-order 6...Bxd2+ 7.Bxd2 Nxd2 8.Qxd2 Qe7, but does not mention the possibility of White answering 6...Bxd2+ with 7.Nxd2. A possible improvement for Black (after 4...Bb4+ 5.Nbd2) would be 5...d5 with compensation for the pawn in all lines.
The line 4.Qc2 immediately attacks the Ne4, as a retreat by Black would effectively surrender his temporary lead in development, which is the compensation for the sacrificed pawn. Black must continue to develop while trying to keep the Ne4 on its square, but that is by no means easy. Borik thinks 4.Qc2 is the move "that gives Black the most problems to solve", but Lalic does not agree at all, stating that the reply "4...Bb4+ [....] followed by d7-d5 ensures Black a rapid development and plenty of counterplay. It is for this reason that 4.Qc2 is not on the danger list". The reply 4...Bb4+ (see diagram at right) pins the white pieces before deciding what to do with the Ne4. White cannot reply 5.Bd2 as he would lose the bishop pair and Black would easily regain the e5-pawn with Nc6/Qe7/0-0/Re8. After 5.Nd2 this knight would be misplaced and would block the Bc1, so Black could open the game with 5...d5 in favourable circumstances. Best for White is 5.Nc3 d5 6.exd6 Bf5 7.Bd2 Nxd6 8.e4! Bxc3 9.Bxc3 Bxe4 when Black has regained his pawn but White has the bishop pair and possibilities of an attack on the kingside.
| a | b | c | d | e | f | g | h | ||
| 8 |
|
8 | |||||||
| 7 | 7 | ||||||||
| 6 | 6 | ||||||||
| 5 | 5 | ||||||||
| 4 | 4 | ||||||||
| 3 | 3 | ||||||||
| 2 | 2 | ||||||||
| 1 | 1 | ||||||||
| a | b | c | d | e | f | g | h | ||
1.d4 Nf6 2.c4 e5 3.dxe5 Ng4 4.e3
Apart from the main lines 4.Bf4, 4.Nf3 and 4.e4, the only significant other fourth move is 4.e3 to continue by 4...Nxe5 5.Nh3 (or the other move-order 4.Nh3 and 5.e3) so that the white knight starts the journey Ng1-h3-f4-d5 reach its ideal d5-square. The idea with 4.e3 and 5.Nh3 was favorite of a leading Soviet coach and writer Mikhail Shereshevsky, who wrote in his 1994 book The Soviet Chess Conveyor that the line was first shown to him by a strong correspondence player Donatas Lapienis. Black has tried to prevent White's idea by the suitably strange-looking move 5...Ng6, taking the f4-square from the Nh3. Then White can develop along various setups, the most active being 6.Qh5 with the possibility Nh3-g5 in store to recycle the knight towards a more central position. Black can also ignore White's intentions and concentrate on his own play by placing the Nb8 on c5, in order to put pressure on the d3-square. After 5...g6 6.Nf4 Bg7 7.Be2 0-0 8.0-0 d6 9.Nc3 Nbd7 10.Qd2 a5 11.b3 Nc5 the position of Black's knights is secured and Black's position is similar to the Leningrad variation of the Dutch Defence (once he has played f7-f5). White has no reason, however, to abandon the a1-h8 diagonal to Black, and he can try 5...g6 6.Bd2 d6 7.Nf4 Bg7 8.Bc3 0-0 9.Be2 Nbd7 10.Nd2 b6 and in one game White gained a minimal edge.
| a | b | c | d | e | f | g | h | ||
| 8 |
|
8 | |||||||
| 7 | 7 | ||||||||
| 6 | 6 | ||||||||
| 5 | 5 | ||||||||
| 4 | 4 | ||||||||
| 3 | 3 | ||||||||
| 2 | 2 | ||||||||
| 1 | 1 | ||||||||
| a | b | c | d | e | f | g | h | ||
A few other lines have been tried, with the outcome varying from an immediate equality to a clear advantage for Black. The cooling 4.e6 avoids complications and heads for an equal endgame with 4...dxe6 5.Qxd8+ Kxd8, Black's loss of the right to castle being of no great importance since queens have been traded. If Black wants to avoid this early endgame, he can try 4...Bb4+ 5.Nc3 Bxc3+ 6.bxc3 dxe6 and now the exchange of queens would give a plus to Black, as the white queenside pawns are isolated and doubled. The greedy 4.f4 is weak because White neglects his development and weakens the a7-g1 diagonal. Black can immediately exploit this with 4...Bc5, which threatens a fork on f2 and forbids White's castling; Black may later push d7-d6 to open the centre, e.g. 5.Nh3 0-0 6.Nc3 d6 7.exd6 cxd6 when Black has good squares for its pieces while White's castling is delayed.
Another reasonable-looking move is 4.Qd4 as it protects the e5-pawn and attacks the Ng4. However, "the problem for White in the Budapest is that natural moves often lead to disaster". Best for Black is the gambit 4...d6 5.exd6 Nc6! 6.Qd1 Bxd6, when the natural 7.Nf3?? is an error because of 7...Nxf2! 8.Kxf2 Bg3+ winning the queen. White must develop quietly with moves like Nc3/Nf3/e3/Be2, allowing Black to find active positions for his pieces with 0-0/Be6/Qe7/Rfd8, and preparing several sacrificial ideas on e3 or f2, with excellent attacking possibilities. Similar to 4.Qd4 is 4.Qd5 when after 4...Nc6 White can seize the last opportunity to return to calm waters with 5.Bf4 Bb4+ 6.Nc3 which will transpose in the Rubinstein line, or he can try 5.Nf3 d6 6.exd6 Be6 7.d7+ Bxd7 when Black's lead in development compensates for the pawn.
Declining the gambit is almost never seen in master play because it promises White equality at best. After 3.d5?! Bc5 White has prematurely blocked the central position, giving the a7-g1 diagonal to Black for his bishop. In this variation Black can either play on the queenside with a plan like b5/Nb6/Bd7, or on the kingside with a plan like Ne8/g6/Ng7/f5. The shy 3.e3?! exd4 4.exd4 transposes into a line of the Exchange Variation of the French Defence with 4...d5, but Black can also develop rapidly with 4...Bb4+ 5.Bd2 Bxd2+ 6.Nxd2 0-0. After 3.e4? Black gains a crushing attack via 3...Nxe4 4.dxe5 Bc5 5.Nh3 d6 6.Qe2 f5 7.exf6 0-0! 8.fxg7 Re8 9.Be3 Bxe3 10.fxe3 Bxh3 11.gxh3 Qh4+. After 3.Bg5?! the game Ladmann-Tartakower (Scarborough 1929) continued with 3...exd4 4.Qxd4 Be7 5.Nf3 Nc6 6.Qd1 Ne4 7.Bxe7 Qxe7 8.a3 d6 9.e3 0-0 10.Be2 Qf6 11.Nbd2 Bf5 when both Tseitlin and Borik assess the position as favourable for Black. After 3.Nf3?! the game Menchik-Tartakower (Paris 1929) continued with 3...e4 4.Nfd2 d5 5.cxd5?! Qxd5 6.e3 Bb4 7.Nc3 Bxc3 8.bxc3 0-0 and White has problems developing his kingside because of the potential weakness of g2.
|
|
||||||||||||||||||||||||||||||||||||||||||||||||||||||||||||||||||||||||||||||||||||||||
The following game was played between the Chinese GM Wu Shaobin (White) and Armenian IM Ashot Nadanian (Black) at Singapore 2006.
1.d4 Nf6 2.c4 e5 3.dxe5 Ng4 4.Nf3 Bc5 5.e3 Nc6 6.Be2 Ncxe5 7.Nxe5 Nxe5 8.0-0 0-0 9.b3 Re8 10.Bb2 a5 Preparing Dolfi Drimer's rook manoeuvre Ra8-a6-h6. Nadanian calls the pawn advance a7-a5 "the soul of the Budapest Gambit". 11.Nc3 Ra6 12.Ne4 Ba7 13.Ng3 Qh4 14.Nf5 Qg5!? This was a new move, before 14...Qe4 had been played. 15.Nd4 Rg6 16.g3 d5?! 18...Qh6 was stronger. 17.cxd5? White should have played 17.Nb5! 17...Bh3! 18.Re1 Ng4 19.Nf3 Qxe3! Karolyi writes, "This shows Kasparov-like aggression and ingenuity." 20.Bd4 Qxf2+!! 21.Bxf2 Bxf2+ 22.Kh1 Bb6 23.Qb1? White should have defended with 23.Rf1! After 23...Ne3 24.Qd3 Bg2+ 25.Kg1 Bh3 White can either repeat moves with 26.Kh1, or try 26.Nd4. 23...Nf2+ 24.Kg1 Rf6! Black has time to increase the pressure. 25.b4! If 25.Qc2?, then 25...Ng4+ 26.Kh1 Bg2+! winning the queen. 25...a4! But not 25...Rxf3? 26.bxa5. 26.Ng5 Black can now force mate in 8 moves. 26...Ng4+! 27.Kh1 Bg2+!! "This is a marvellous move, and it must have been such a thrill to play it on the board." (Karolyi). 28.Kxg2 Rf2+ 29.Kh3 Rxh2+ 30.Kxg4 h5+ 31.Kf4 Be3+ 0-1