
- Chess World Cup
- FIDE Grand Prix
- Olympiad
- World Championship
- List of strong tournaments
- List of world championships

- Checkmate patterns
- Chess openings
- Chess strategy
- Chess tactics
- Chess theory
- Endgames
- Pawn structure
- Problems/Compositions


 |
 |
 |
The Tarrasch rule is a general principle that applies in the majority of chess middlegames and endgames. Siegbert Tarrasch (1862-1934) stated the "rule" that rooks should be placed behind passed pawns - either yours or your opponent's. The idea behind the guideline is that (1) if a player's rook is behind his passed pawn, the rook protects it as it advances, and (2) if it is behind an opponent's passed pawn, the pawn cannot advance unless it is protected along its way.
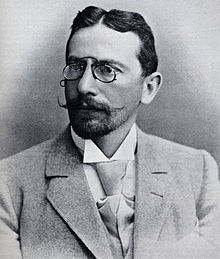 Siegbert Tarrasch
The original quote, from page 57 of his book The Game of Chess (1938) is
"In complicated Rook endings the most important rule is one laid down by the author: The Rook's place is behind the passed pawn; behind the enemy pawn in order to hold it up, behind one's own in order to support its advance."
This "rule" is usually true, but not always, as there are many exceptions. Tarrasch has been quoted as saying, "Always put the rook behind the pawn.... Except when it is incorrect to do so." (Soltis 2003:129).
The advance of the passed pawn lengthens the range of a rook behind and reduces the range of a rook in front. A rook escorting a pawn from ahead must move off, potentially leaving the pawn undefended, if it is to promote. A rook behind an enemy passed pawn can more readily generate counterplay.
Here are two positions to illustrate the principle.
| a | b | c | d | e | f | g | h | ||
| 8 |

      |
8 | |||||||
| 7 | 7 | ||||||||
| 6 | 6 | ||||||||
| 5 | 5 | ||||||||
| 4 | 4 | ||||||||
| 3 | 3 | ||||||||
| 2 | 2 | ||||||||
| 1 | 1 | ||||||||
| a | b | c | d | e | f | g | h | ||
In the first diagram, White's rook is behind his passed pawn on the a-file, and the position is won for White.
The winning technique is straightforward:
The 34th game of the 1927 World Championship match between Alekhine and Capablanca is a classic example of the technique (or see annotated text). The position is after White's 54. Ra4. White won on move 82 (Korchnoi 2002:15).
| a | b | c | d | e | f | g | h | ||
| 8 |
|
8 | |||||||
| 7 | 7 | ||||||||
| 6 | 6 | ||||||||
| 5 | 5 | ||||||||
| 4 | 4 | ||||||||
| 3 | 3 | ||||||||
| 2 | 2 | ||||||||
| 1 | 1 | ||||||||
| a | b | c | d | e | f | g | h | ||
Similar positions with the rook behind the enemy passed pawn are usually a draw, but not always. The next position is after White's 35th move in the eighth game of the Henrique Mecking versus Victor Korchnoi match in 1974. White will move Ra6 as soon as possible. Black's rook is in front of his passed pawn on the a file, and the game ended in a draw on move 55 (Korchnoi 2002:15-16).
Anand vs. Kramnik, 2007| a | b | c | d | e | f | g | h | ||
| 8 |
|
8 | |||||||
| 7 | 7 | ||||||||
| 6 | 6 | ||||||||
| 5 | 5 | ||||||||
| 4 | 4 | ||||||||
| 3 | 3 | ||||||||
| 2 | 2 | ||||||||
| 1 | 1 | ||||||||
| a | b | c | d | e | f | g | h | ||
In this game between Viswanathan Anand and Vladimir Kramnik from the 2007 World Chess Championship, Black's rook is in front of his passed pawn; the white rook will get behind the pawn:
Black advanced the pawn to a2, but could do no better than to exchange the passed pawn and rook for the white rook, reaching a king and pawn endgame that ended in a draw (see stalemate) on move 65 (Benko 2008:49).
Unzicker vs. Lundin, 1954| a | b | c | d | e | f | g | h | ||
| 8 |
|
8 | |||||||
| 7 | 7 | ||||||||
| 6 | 6 | ||||||||
| 5 | 5 | ||||||||
| 4 | 4 | ||||||||
| 3 | 3 | ||||||||
| 2 | 2 | ||||||||
| 1 | 1 | ||||||||
| a | b | c | d | e | f | g | h | ||
In the position from a game between Wolfgang Unzicker and Erik Lundin, White to move wins, however 48. f3+! is the only winning move. If the black pawn were still on f7, the black king could go back to f6 or g7 and the position would be a draw. (If 48. a7? Ra2+ and 49... Kf3 draws.)
| a | b | c | d | e | f | g | h | ||
| 8 |
|
8 | |||||||
| 7 | 7 | ||||||||
| 6 | 6 | ||||||||
| 5 | 5 | ||||||||
| 4 | 4 | ||||||||
| 3 | 3 | ||||||||
| 2 | 2 | ||||||||
| 1 | 1 | ||||||||
| a | b | c | d | e | f | g | h | ||
The reason this type of position was long thought to be an easy draw is as follows:
Recent theoretical analysis of this position shows that White has a strong maneuver:
Black must play very carefully to draw, rather than the very easy draw that was long thought to be the case.
V. Kantorovich, 1988 and J. Steckner, 2003| a | b | c | d | e | f | g | h | ||
| 8 |
|
8 | |||||||
| 7 | 7 | ||||||||
| 6 | 6 | ||||||||
| 5 | 5 | ||||||||
| 4 | 4 | ||||||||
| 3 | 3 | ||||||||
| 2 | 2 | ||||||||
| 1 | 1 | ||||||||
| a | b | c | d | e | f | g | h | ||
Kantorovich analyzed the position in the diagram on the right and thought that Black draws with two tempos to spare. In 2003 Steckner found an improvement for White that wins. Black's pieces are in their optimum positions: the rook is behind the a-pawn and attacking the f-pawn and the king is in its most active location. If 1. Ra8 Kf5 Black has an easy draw. However, White has a better plan which wins with precise play:
| a | b | c | d | e | f | g | h | ||
| 8 |
      |
8 | |||||||
| 7 | 7 | ||||||||
| 6 | 6 | ||||||||
| 5 | 5 | ||||||||
| 4 | 4 | ||||||||
| 3 | 3 | ||||||||
| 2 | 2 | ||||||||
| 1 | 1 | ||||||||
| a | b | c | d | e | f | g | h | ||
This 2008 game between Lev Aronian and Vassily Ivanchuk ended in a draw after 62 moves. The evaluation of this type of position with an extra b-pawn is still in flux as of 2010, but current theory is that it is drawish (Soltis 2010:43).
| a | b | c | d | e | f | g | h | ||
| 8 |
|
8 | |||||||
| 7 | 7 | ||||||||
| 6 | 6 | ||||||||
| 5 | 5 | ||||||||
| 4 | 4 | ||||||||
| 3 | 3 | ||||||||
| 2 | 2 | ||||||||
| 1 | 1 | ||||||||
| a | b | c | d | e | f | g | h | ||
There are exceptions to the Tarrasch rule. Here are some.
| a | b | c | d | e | f | g | h | ||
| 8 |
|
8 | |||||||
| 7 | 7 | ||||||||
| 6 | 6 | ||||||||
| 5 | 5 | ||||||||
| 4 | 4 | ||||||||
| 3 | 3 | ||||||||
| 2 | 2 | ||||||||
| 1 | 1 | ||||||||
| a | b | c | d | e | f | g | h | ||
This position from Nigel Short and Artur Yusupov in 1984 is an exception to the rule, since white's king is stuck in front of the pawn (Müller & Lamprecht 2001:199). White played 1. Rh3 (rook behind passed pawn), black replied 1. ... Kf5 and a draw resulted a few moves later. The move 1. Rf7 by White leads to a win.
| a | b | c | d | e | f | g | h | ||
| 8 |
|
8 | |||||||
| 7 | 7 | ||||||||
| 6 | 6 | ||||||||
| 5 | 5 | ||||||||
| 4 | 4 | ||||||||
| 3 | 3 | ||||||||
| 2 | 2 | ||||||||
| 1 | 1 | ||||||||
| a | b | c | d | e | f | g | h | ||
The position from a 1995 game between Andrei Kharlov and Alexander Morozevich is one in which the Tarrasch rule does not apply (for Black) (Emms 2008:115-16). The move 1. ...Rb7 would be in accordance with the Tarrasch rule, but 1. ... Re5 is the correct method because White's king is cut off from the pawn, White will have to spend a lot of time activating his rook, and by that time the black king will be able to get over to the queenside. The rule still applies for White, however, and the game continued:
After 13 Kg2 Rc1 14. Rd8 b1=Q 15. Rb8+ Kc6 16. Rxb1 Rxb1 Black's king is close enough to the kingside pawns to stop them.
| a | b | c | d | e | f | g | h | ||
| 8 |
|
8 | |||||||
| 7 | 7 | ||||||||
| 6 | 6 | ||||||||
| 5 | 5 | ||||||||
| 4 | 4 | ||||||||
| 3 | 3 | ||||||||
| 2 | 2 | ||||||||
| 1 | 1 | ||||||||
| a | b | c | d | e | f | g | h | ||
The 1993 game between Vladimir Kramnik and Alexander Beliavsky has an unusual position in which following the Tarrasch Rule is incorrect. White played 1. Ra1 and lost. 1. Rb8, abandoning the pawn so the rook can attack from behind, draws. The endgame with rooks and f- and h-pawns was analyzed to be a draw by Mikhail Botvinnik in the 1940s (with correct defense) (Beliavsky & Mikhalchishin 2003:86,89-90).
| a | b | c | d | e | f | g | h | ||
| 8 |
|
8 | |||||||
| 7 | 7 | ||||||||
| 6 | 6 | ||||||||
| 5 | 5 | ||||||||
| 4 | 4 | ||||||||
| 3 | 3 | ||||||||
| 2 | 2 | ||||||||
| 1 | 1 | ||||||||
| a | b | c | d | e | f | g | h | ||
In this 1992 game between Artur Yusupov and Jan Timman, 35. Re4! wins but 35. Ra1? in the actual game only draws. The game was drawn twenty moves later (Müller & Pajeken 2008:280).